
Ooohh your thinking that this tutorial will be hard to understand ei? Don't worry! You don't have to be a pro coder or techie chum to get this. If your a blogger who wants streamlined photos without editing everything in Photoshop then this tutorial is for you. Go grab yourself a cup of coffee then let's get this show started. I hope you guys are ready!
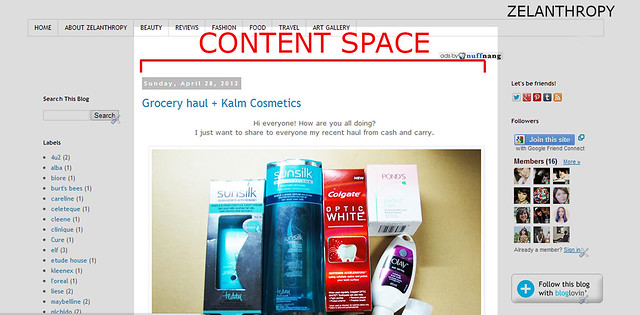
The first thing you need to know is the size of your content area. The content area is where your posts shows up. Normally it's either on the left side of your blog (beside your sidebar) or at the center (in between your sidebars).
To do this go to Template >> Customize >> Adjust Widths
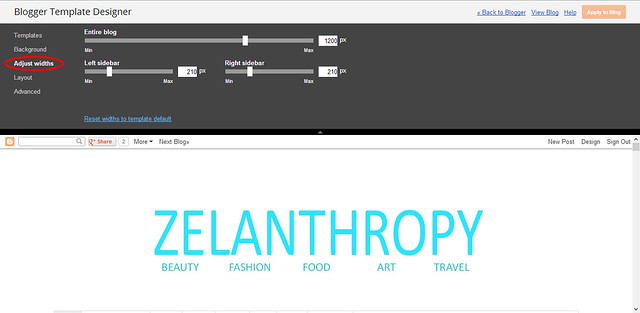
Here you'll see the whole measurement of your blog page. Now we have to do the math! To find out your content space width: add both the left and right width measurement and subtract it to your entire blog measurement.
Example: 210 + 210 = 420 (side bar measurements) ;
1200 (entire blog measurement) - 420 (side bar measurement) = 780.
780 is now your content space.
As reference: My content space is 780. I am currently using the measurement of 680 width for all my blog photos. I left at least 100 width for allowance.
After having a better understanding of how big your work space is, it's now time to start uploading photos. I DO NOT RECOMMEND UPLOADING PHOTOS WITH BLOGGERS PRE-SET PHOTO UPLOADING TOOL. Why? Please read on..
- Blogger tends to pixelate your photos. Bummer!
- Blogger only gives you certain sizes that even though you can manipulate it with the HTML button on the upper left side of your work area will still render your photos pixelated.
- Also photos being uploaded using the blogger pre-set upload tool goes straight to picasa web and I'm not a big fan of it. I know many bloggers love picasa because of its features and whatnot but I have a special spot for Flickr.
So going back to the point, select a photo hosting site (Photobucket, Flickr, ImageShack, etc.) and upload your photos there. I know it's a pain to be jumping back and forth on your tabs but trust me it's worth the effort. I'll be having a Flickr and Photobucket demonstration in this post so feel free to choose whichever platform you prefer.
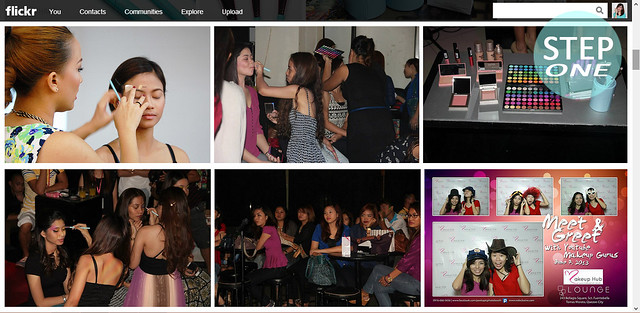
FOR FLICKR
STEP 1
After signing up and uploading your photos in Flickr click on your photo stream and choose which photo to embed to your blog entry.
STEP 2
After clicking on the photo you want to embed, you will find a "more ways to share" button on the lower right corner of the page right beside the comment button.
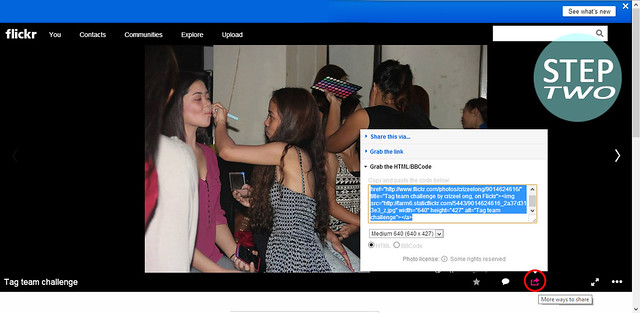
You want to get the html code. Just click on the html button right beside the bb code. Choose which size closely matches your content area then copy the code they will give you.
STEP 3
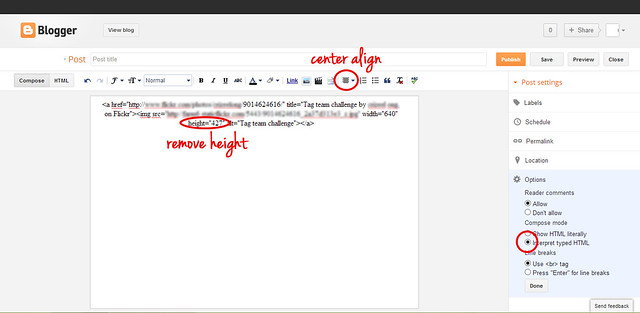
Make your blog entry now. Paste the code that you've copied from Flickr.
REMINDERS!
- Remove the height measurement. We're after achieving the same width size for your photos. We want a streamlined feel. Don't worry because your photos will be auto proportioned depending on the width that you will input.
- Edit your width size. If the photo you've uploaded in Flickr isn't your desired size, you can still change it to fit perfectly in your content space. Example: The photo I've uploaded is only 640 in width and I want it to be 680 in width, just change the number indicated in the code. look for this: width="type your desired width here"
- Align your photos. I personally prefer my photos to be center aligned so what I do is I select the whole code and just click on the center align button.
- Interpret typed html. Make sure that you do this! At the right side of your work area you will see the OPTIONS button. Click it and look for the COMPOSE MODE. Choose INTERPRET TYPED HTML. This will convert your code into a photo.
*After editing everything on the code click on preview. Congratulations! (claps~) You've just learned how to embed/code your photos with Flickr.
FOR PHOTOBUCKET
STEP 1
After signing up and uploading your photos in Photobucket click on your library and choose which photo to embed to your blog entry.

STEP 2
Position your mouse cursor to the upper right side of the photo you want to embed. A gear icon will appear. Click on it then a drop down box will appear. Click on get links.

A pop up box will appear. Click on the HTML bar space and the content within the space will instantly be copied.

STEP 3
Make your blog entry now. Paste the code that you've copied from Photobucket.

Insert a width code in the html code you copied from Photobucket. Look for border="0" and paste your desired width right before it.
Example: width="type your desired width here" border="0"
REMINDERS!
REMINDERS!
- Align your photos. I personally prefer my photos to be center aligned so what I do is I select the whole code and just click on the center align button.
- Interpret typed html. Make sure that you do this! At the right side of your work area you will see the OPTIONS button. Click it and look for the COMPOSE MODE. Choose INTERPRET TYPED HTML. This will convert your code into a photo.
*After editing everything on the code click on preview. Congratulations! (claps~) You've just learned how to embed/code your photos with Photobucket.
TIPS:
- Deducting your content space by a hundred or less can give your photos allowance when center aligned to make it look more streamlined. You guys still have to check in your template>>customize>>adjust width if your satisfied with the spacing of your photos. TRIAL and ERROR will be your best friend. Don't worry once you've managed to decide on a measurement, you'll just have to apply it to the rest of the photos you will be embedding in your blog entries. (Isang hirap lang as we call it)
- DO NOT UPLOAD YOUR PHOTO IN 300 DPI unless you have text on it. 72 dpi will already be good if your uploading a standard photo on your blog. This will speed up the upload time and also the loading time of your photos in your blog. Nothing is more annoying than to wait like forever for a blog page to load.
- If you do not want to change the resolution/dpi of your photos and your already editing it on Photoshop then opt to change the image size of your photo. 3 to 4 inches in width is already great for blogs. ☺
Lastly..
I've mentioned earlier that I have a special spot for Flickr. Why is that?
- Flickr gives license to your photos. You don't want other people stealing or grabbing your photos and uploading it on their site with out informing you or giving you credit for your hard work right?
- Flicker is a good place to store your photos. Let's face it, at the end of the day you'll need a place where you can store your photos prior to deleting. Flickr is a great place for that. It keeps your photos without compressing it or pixelating it.
- It's a great photo album. I've been a member of flickr ever since 2010 and I could still view my solid unpixelited photos from three years ago. It's a great photo gallery you can go back to 5 years from now.
- 1 Terabyte storage for your photos. Some other platform only gives you up to 2 GB storage capacity. You'll have to pay up for additional storage capacity if you'd want more.
* I'm not promoting Flickr in any way here okay. I'm just telling you guys my thoughts and honest opinion regarding which platform I prefer. It's up to you whatever platform you decide to sign up for and I'll support you guys all the way. Also If you guys know a better platform, please do share it with me. I'd love to give it a try ☺
PS: Just to show you guys how the results are..
I used photo hosting site Flickr for my Flickr demonstration and Photobucket for my Photobucket demonstration. It gives the same results but I'd say Photobucket is easier to use (will be great for beginners) but I still prefer Flickr because of my reasons above. You'll just have to base everything on your own preference ☺
I hope you guys enjoyed my non-beauty/fashion related post. Thank you for reading until the very end. If you did give this tutorial a try, let me know your thoughts about it. Also if you guys have your own tips and tricks up in your sleeves please do share it with me. Hung up with one step? Leave a message and I'll get back to you as soon as I can ☺
Thank you so much for droppin' by and have a nice day! Don't forget to like my facebook page, follow me on bloglovin and google friend connect for more updates.
Go be beautiful!

No comments:
Post a Comment